Self-hosted home network traffic monitoring with ntopng and a Fritz!Box
This post shows how I set up an home network traffic monitoring system in an unconventional way.
One day I have decided that I wanted to monitor the traffic of my home network.
For the services I self-host in my home, I had recently upgraded from a Raspberry Pi 3B+ to a refurbished Dell WYSE 5070 thin client and I was looking for other things to self-host.
Then I came across ntopng, which is an open-source network traffic monitoring and analysis tool, and I said to myself that I wanted it.
The ideal setup would be installing it on a dedicated machine to use as router, but I wasn’t planning on that. The less ideal but still cool setup would be using a mirrored port on a switch, to forward all the traffic to the monitoring machine.
The problem was that neither my main ISP-provided router and Fritz!Box router (that I’m currently using just as a switch) had the possibility to set one port as mirrored.
So how could I monitor my homenet’s traffic without even having the physical prerequisites to do it?
The hidden beauties of Fritz!Boxes
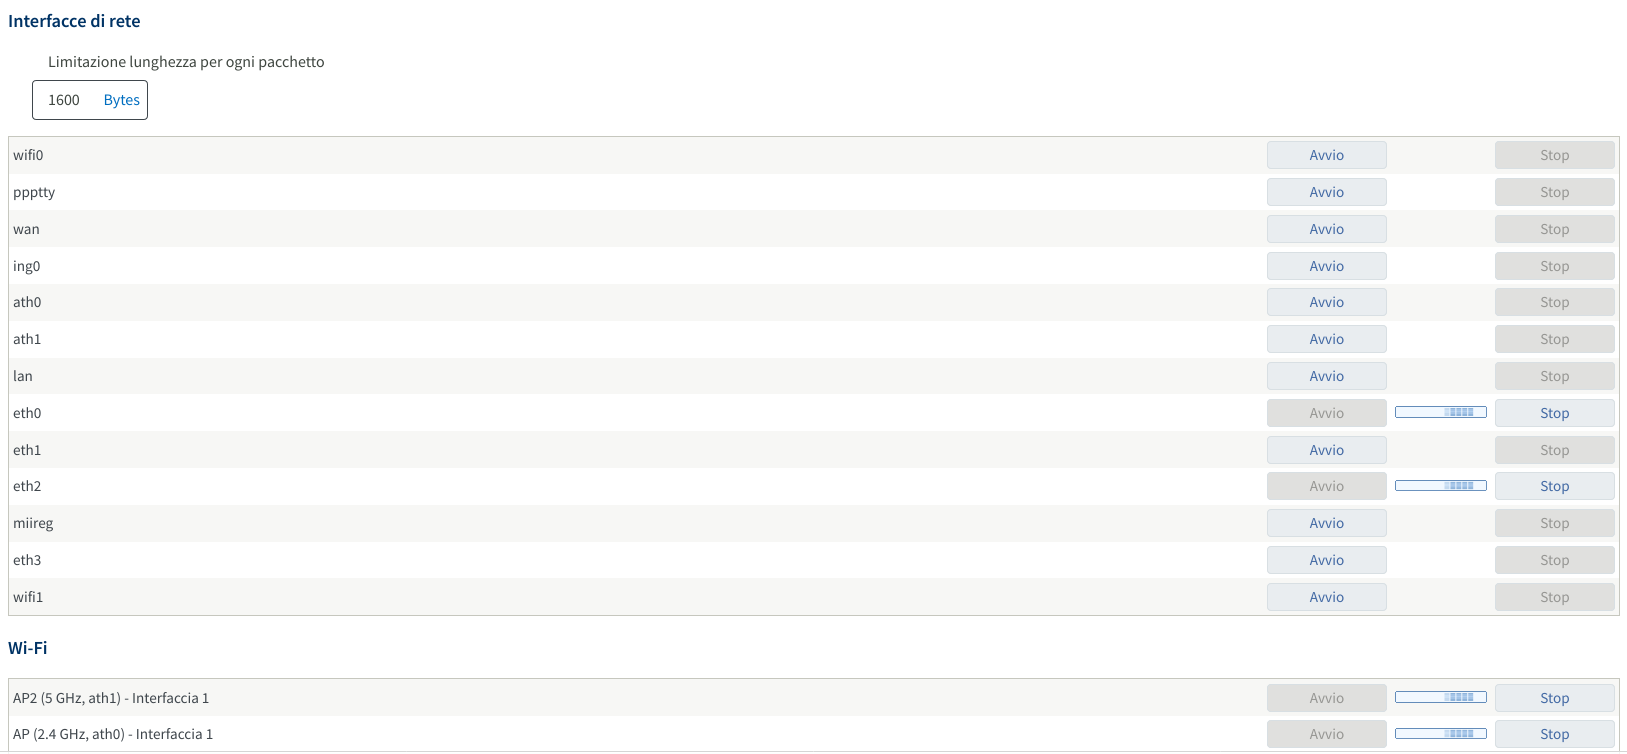
Actually I could, because after some quick searches I discovered that every Fritz!Box router has some obscure undocumented pages, including http://fritzbox/html/capture.html, which allows to freely capture the traffic of all the available network interfaces.
When you start capturing, the stream of packets in the Libpcap format starts downloading, and you can read it with Wireshark or tshark.
Now back to ntopng: can it read pcap files? The answer is yes! Quoting the docs:
[--interface|-i] <interface|pcap>   | Input interface name (numeric/symbolic),
                                    | view or pcap file path
Now I suddenly had all the “physical prerequisites” that were missing before.
The plan
The plan was easy; I needed to:
- Write a script to authenticate to the Fritz!Box and start the packet captures.
- Tell ntopng to listen on the downloaded pcap files.
Actually, an example script is already provided in the ntopng’s GitHub repository, so I only needed to change it according to my needs and preferences.
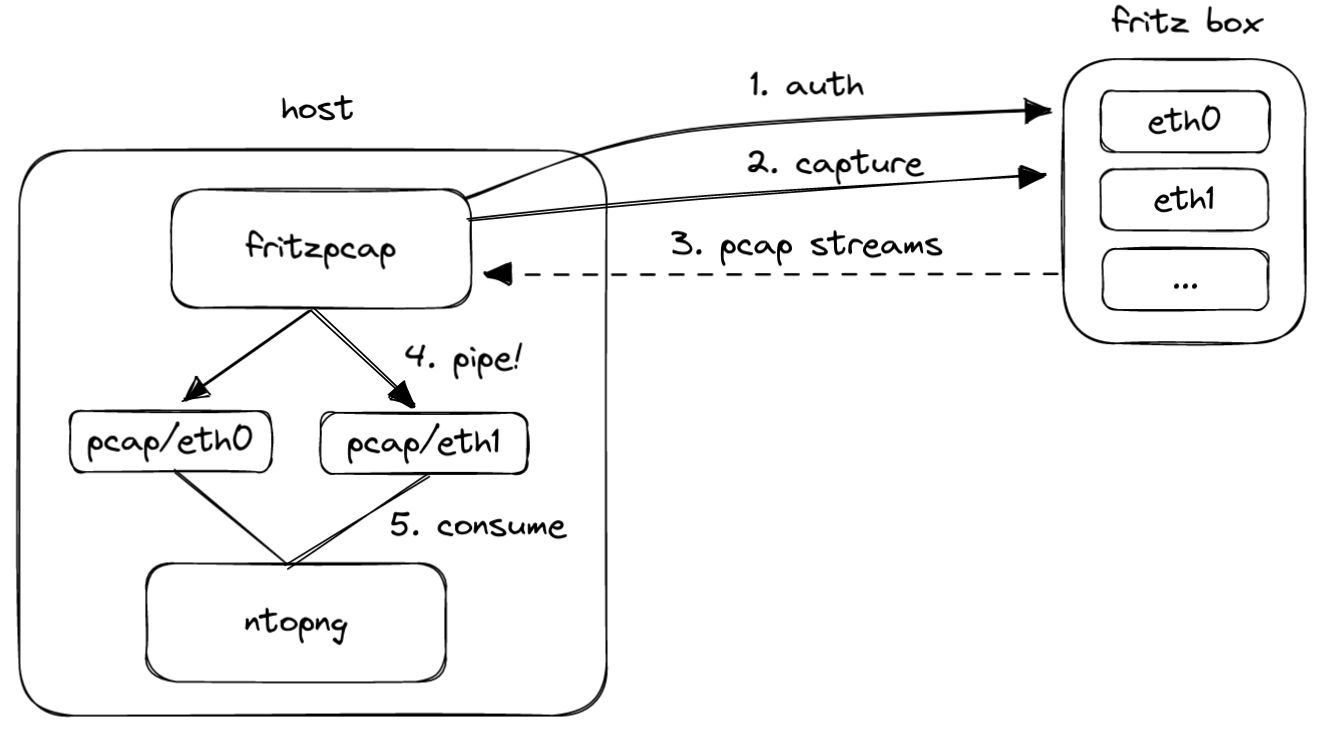
To be more specific, I wanted to build this:
- A fritzpcap Docker container to:
- Authenticate to the Fritz!Box.
- Start capturing traffic to some FIFO pipes, one per interface.
- A ntopng Docker container to listen from the pipes containing the pcaps.
The execution
To explain the execution I’ll follow a top-down approach.
Docker Compose file
My docker-compose.yml looks like this:
version: '3'

services:
  app:
    container_name: ntopng
    image: ntop/ntopng
    volumes:
      - data:/var/lib/ntopng
      - ./pcap:/pcap
      - ./ntopng.conf:/ntopng.conf:ro
      - /etc/timezone:/etc/timezone:ro
      - /etc/localtime:/etc/localtime:ro
    environment:
      - TZ=Europe/Rome
    command:
      - "/ntopng.conf"
    ports:
      - 3000
    networks:
      - proxy
    restart: unless-stopped

  fritzpcap:
    build: ./fritzpcap
    environment:
      - FRITZIP=http://fritzbox
      - FRITZUSER={{ fritz.username }}
      - FRITZPWD={{ fritz.password }}
    volumes:
      - ./pcap:/pcap
    restart: unless-stopped

volumes:
  data:


networks:
  proxy:
    external: true
Some notable things:
- Both containers have the
./pcap:/pcapbind mount:- We want fritzpcap to place here the pcap pipes.
- We want ntopng to read from there.
ntopng.confis the configuration file, and it is given in input when ntopng’s container starts.- fritzpcap’s image must be built from
./fritzpcap. - The environment variables prefixed with
FRITZmust obviously be changed properly.
fritzpcap
Now in the ./fritzpcap directory I put both the script and the image definition.
As introduced before, the pcap.sh is a slight modification of the one provided by ntopng authors (GNU GPLv3.0):
#!/bin/bash

SIDFILE="/tmp/fritz.sid"

if [ -z "$FRITZIP" ] || [ -z "$FRITZPWD" ] || [ -z "$FRITZUSER" ] ; then echo "FRITZUSER, FRITZPWD, FRITZIP must all be set" ; exit 1; fi

echo "Logging in as $FRITZUSER into Fritz!Box $FRITZIP"

if [ ! -f $SIDFILE ]; then
  touch $SIDFILE
fi

SID=$(cat $SIDFILE)

# Request challenge token from Fritz!Box
CHALLENGE=$(curl -k -s $FRITZIP/login_sid.lua | grep -o "<Challenge>[a-z0-9]\{8\}" | cut -d'>' -f 2)

# Very proprietary way of AVM: create an authentication token by hashing the challenge token with the password
HASH=$(perl -MPOSIX -e '
    use Digest::MD5 "md5_hex";
    my $ch_Pw = "$ARGV[0]-$ARGV[1]";
    $ch_Pw =~ s/(.)/$1 . chr(0)/eg;
    my $md5 = lc(md5_hex($ch_Pw));
    print $md5;
  ' -- "$CHALLENGE" "$FRITZPWD")
  curl -k -s "$FRITZIP/login_sid.lua" -d "response=$CHALLENGE-$HASH" -d 'username='${FRITZUSER} | grep -o "<SID>[a-z0-9]\{16\}" | cut -d'>' -f 2 > $SIDFILE

SID=$(cat $SIDFILE)

# Check for successfull authentication
if [[ $SID =~ ^0+$ ]] ; then echo "Login failed. Did you create & use explicit Fritz!Box users?" ; exit 1 ; fi

echo "Login successful"

echo "Creating pipes"
rm -f pcap/*
mkfifo pcap/eth0 pcap/eth2 pcap/eth3 pcap/ath0 pcap/ath1

echo "Starting packet capture on the pipes: $(ls pcap | xargs echo)"
wget --no-check-certificate -qO- $FRITZIP/cgi-bin/capture_notimeout?ifaceorminor=1-eth0\&snaplen=\&capture=Start\&sid=$SID > pcap/eth0 &
wget --no-check-certificate -qO- $FRITZIP/cgi-bin/capture_notimeout?ifaceorminor=1-eth2\&snaplen=\&capture=Start\&sid=$SID > pcap/eth2 &
wget --no-check-certificate -qO- $FRITZIP/cgi-bin/capture_notimeout?ifaceorminor=1-eth3\&snaplen=\&capture=Start\&sid=$SID > pcap/eth3 &
wget --no-check-certificate -qO- $FRITZIP/cgi-bin/capture_notimeout?ifaceorminor=4-133\&snaplen=\&capture=Start\&sid=$SID > pcap/ath0 &
wget --no-check-certificate -qO- $FRITZIP/cgi-bin/capture_notimeout?ifaceorminor=4-135\&snaplen=\&capture=Start\&sid=$SID > pcap/ath1 &

echo "Capturing... (barrier reached)"

wait $(jobs -p)
echo "All packet capture jobs have been interrupted"
Some notable things:
- The authentication result will be saved in a so called “SID file”.
- The content of the SID file must be given as query string to authenticate the HTTP calls.
- If the login is successful, FIFO pipes will be created in the
pcapdirectory, for each interface to monitor. - The interface identifiers to use are not the same for every model, and can be known by inspecting the Fritz!Box’s capture page.
- If all jobs finish, the container will restart.
Dockerfile
The Dockerfile to build fritzpcap is very tiny and looks like this:
FROM alpine:3.17

RUN apk add wget curl perl bash && \
    mkdir /pcap
COPY pcap.sh /pcap.sh

ENTRYPOINT ["bash", "/pcap.sh"]
ntopng’s configuration
Finally, the ntopng.conf file contains:
-i=/pcap/eth0
-i=/pcap/eth2
-i=/pcap/eth3
-i=/pcap/ath0
-i=/pcap/ath1
--local-networks="192.168.1.0/24"
--community
Where the options are pretty much self-explanatory. Further information on ntopng’s documentation.
Ansible playbook
Since while doing this project I have also been learning Ansible, I wrapped everything in this playbook:
---
- name: ntopng network monitor
  hosts: wyse
  vars_files:
    - ../../vault.yml

  tasks:
    - name: Ensure path exists
      file:
        path: "~/ntopng/pcap"
        owner: "{{ ansible_user_id }}"
        group: "{{ ansible_user_id }}"
        state: directory
        mode: 0755

    - name: Docker-Compose file
      ansible.builtin.template:
        src: templates/docker-compose.yml
        dest: "~/ntopng/docker-compose.yml"
        owner: "{{ ansible_user_id }}"
        group: "{{ ansible_user_id }}"
        mode: preserve

    - name: ntopng.conf
      ansible.builtin.template:
        src: templates/ntopng.conf
        dest: "~/ntopng/ntopng.conf"
        owner: "{{ ansible_user_id }}"
        group: "{{ ansible_user_id }}"
        mode: preserve

    - name: fritzpcap
      ansible.builtin.copy:
        src: templates/fritzpcap
        dest: ~/ntopng/
        owner: "{{ ansible_user_id }}"
        group: "{{ ansible_user_id }}"
        mode: preserve

    - name: up
      community.docker.docker_compose:
        project_src: ~/ntopng
        build: true
        recreate: always
Conclusion
After these steps, my homenet’s network monitor system was up and running.
It allowed me to discover interesting behaviors and patterns that I could have never discovered otherwise.
Something funny was discovering that the geo-location of some contacted IPs in Milan was this:
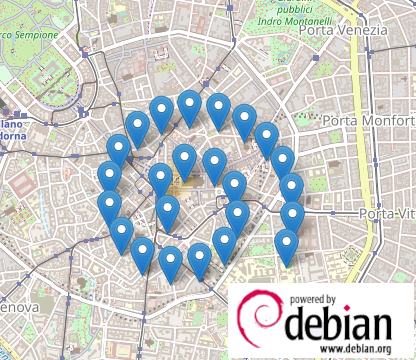
Maybe someone there is an avid Debian fan; or perhaps a big Fibonacci fan :-D